
2018/09/11にOpenSSL 1.1.1がリリースされTLS v1.3がサポートされました。
最新バージョンは、2018/11/20 OpenSSL 1.1.1aで、1.02系はOpenSSL 1.0.2qとなります。
SMAIL v4.20は、OpenSSL 1.0.2系を使っていますので、TLSはv1.2までで、今回
OpenSSL 1.1.1aを使って、TLS v1.3でメール通信できるか試しました。(安定動作確認後、v4.21をリリースする予定です。)
1.OpenSSL 1.1.1aのコンパイル
1) https://www.openssl.org/source/ より、openssl-1.1.1a.tar.gzをダウンロード
2) コンパイル環境の実行(Visual Studio 10.0)
C:workvcfreeopenssl-1.1.1a>”C:Program Files (x86)Microsoft Visual Studio 10.0VCbinvcvars32.bat”
Setting environment for using Microsoft Visual Studio 2010 x86 tools.
3) Configureの実行
C:workvcfreeopenssl-1.1.1a>perl Configure VC-WIN32 no-asm enable-tls1_3 –prefix=C:workvcfreeopenssl-1.1.1a
※・64BITの時は、VC-WIN32の代わりにVC-WIN64A
・asemblerでコンパイル出来るときは、no-asmは外して下さい。SHA等の計算はが早くなる。
・tls1.3を使うので、enable-tls1_3
Configuring OpenSSL version 1.1.1a (0x1010101fL) for VC-WIN32
Using os-specific seed configuration
Set up gcc environment – 3.4.5 (mingw-vista special r3)
Creating configdata.pm
Creating makefile
**********************************************************************
*** ***
*** OpenSSL has been successfully configured ***
*** ***
*** If you encounter a problem while building, please open an ***
*** issue on GitHub <https://github.com/openssl/openssl/issues> ***
*** and include the output from the following command: ***
*** ***
*** perl configdata.pm –dump ***
*** ***
*** (If you are new to OpenSSL, you might want to consult the ***
*** ‘Troubleshooting’ section in the INSTALL file first) ***
*** ***
**********************************************************************
C:workvcfreeopenssl-1.1.1a>
※OpenSSL 1.0.2系の時は、msディレクトリーが生成されてその配下に
nt.makとかntdll.makが作られていましたが、必要なくなりました。
4) makefileの書き換え
smailは、マルチスレッド バージョンの静的なランタイムライブラリを使用するため
コンパイルオプションを変更します。
CNF_CFLAGS=/Gs0 /GF /Gy /MD
=>
CNF_CFLAGS=/Gs0 /GF /Gy /MT
に変更
5) コンパイル
C:workvcfreeopenssl-1.1.1a>nmake
libcrypto.def
libssl.def
libcrypto.lib
libssl.lib
libcrypto_static.lib
libssl_static.lib
が生成される。必要なのはlibcrypto.def,libssl.def,libcrypto_static.lib,libssl_static.lib
2.smailのコンパイル(ソースコードは非公開です。)変更点のみメモ
1)リンクライブラリーの変更
libeay32.lib;ssleay32.lib
=>
libcrypto_static.lib;libssl_static.lib
2)追加で必要なライブラリー
ws2_32.lib
※これをリンクしないと、
__imp__freeaddrinfo
__imp__getnameinfo
__imp__getaddrinfo
がunresolved external symbolとなります。
これだけで、OK。
3.tls 1.3対応のメールサーバを用意
tls 1.3対応のメールサーバがないと、tls 1.3で通信できるかどうか
わからないので、tls 1.3対応のメールサーバを準備。
https://qiita.com/ma3ki/items/3e40775e74bad58a06f3
を参考に、www.picolix.jpにセットアップ。(他からは利用できません。)
再記しておきます。
1) openssl-1.1.1 のインストール
# curl -O -L https://www.openssl.org/source/openssl-1.1.1.tar.gz
# tar xvzf openssl-1.1.1.tar.gz
# cd openssl-1.1.1
# ./config –prefix=/usr/local/openssl-1.1.1 shared zlib
# make
# make install
# echo /usr/local/openssl-1.1.1/lib >> /etc/ld.so.conf.d/openssl.conf
# ldconfig
2) postfix-3.3.1 のインストール
# cp -p /usr/lib/systemd/system/postfix.service /var/tmp
# yum remove -y postfix
# curl -O http://www.ftp.saix.net/MTA/postfix/official/postfix-3.3.1.tar.gz
# tar xvzf postfix-3.3.1.tar.gz
# cd postfix-3.3.1
# CCARGS=”-Wmissing-prototypes -Wformat -Wno-comment -fPIC
-DHAS_LDAP -DLDAP_DEPRECATED=1 -DHAS_PCRE -I/usr/include/pcre
-DHAS_MYSQL -I/usr/include/mysql -DUSE_SASL_AUTH -DUSE_CYRUS_SASL
-I/usr/include/sasl -DUSE_TLS -I/usr/local/openssl-1.1.1/include
-DDEF_CONFIG_DIR=”/etc/postfix””
# AUXLIBS=”-lldap -llber -lpcre -L/usr/lib64/mysql -lmysqlclient
-lm -L/usr/lib64/sasl2 -lsasl2 -L/usr/local/openssl-1.1.1/lib -lssl
-lcrypto -pie -Wl,-z,relro,-z,now”
# make -f Makefile.init makefiles CCARGS=”${CCARGS}” AUXLIBS=”${AUXLIBS}”
# make
# make install
* インストール先は全てデフォルト
3) SSL証明書の取得
www.picolix.jp letsencryptで自動取得しているので割愛
4) postfix に SSL/TLS関連設定を追加して起動
# cat <<_EOL_>> /etc/postfix/main.cf
smtp_tls_CAfile = /etc/pki/tls/certs/ca-bundle.crt
smtp_tls_cert_file = /opt/dehydrated/certs/www.picolix.jp/fullchain.pem
smtp_tls_key_file = /opt/dehydrated/certs/www.picolix.jp/privkey.pem
smtp_tls_loglevel = 1
smtp_tls_security_level = may
smtp_use_tls =yes
smtpd_tls_CAfile = /etc/pki/tls/certs/ca-bundle.crt
smtpd_tls_ask_ccert = yes
smtpd_tls_cert_file = /opt/dehydrated/certs/www.picolix.jp/fullchain.pem
smtpd_tls_ciphers = high
smtpd_tls_key_file = /opt/dehydrated/certs/www.picolix.jp/privkey.pem
smtpd_tls_loglevel = 1
smtpd_tls_mandatory_ciphers = high
smtpd_tls_mandatory_protocols = !SSLv2,!SSLv3,!TLSv1,!TLSv1.1
smtpd_tls_protocols = !SSLv2,!SSLv3,!TLSv1,!TLSv1.1
smtpd_tls_received_header = yes
smtpd_tls_session_cache_database = btree:/var/lib/postfix/smtpd_tls_session_cache
smtpd_use_tls = yes
tls_high_cipherlist = EECDH+AESGCM
tls_preempt_cipherlist = yes
_EOL_
Postfixは、中間証明書を設定する項目がないので、証明書と中間証明書の両方が含まれるfullchain.pem を指定します。
# cp -p /var/tmp/postfix.service /usr/lib/systemd/system/
# systemctl enable postfix
# systemctl start postfix
# postconf -e “alias_maps = hash:/etc/aliases”
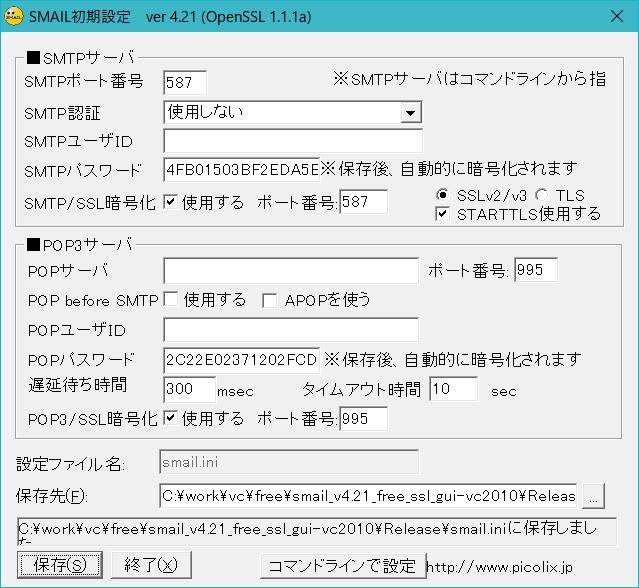
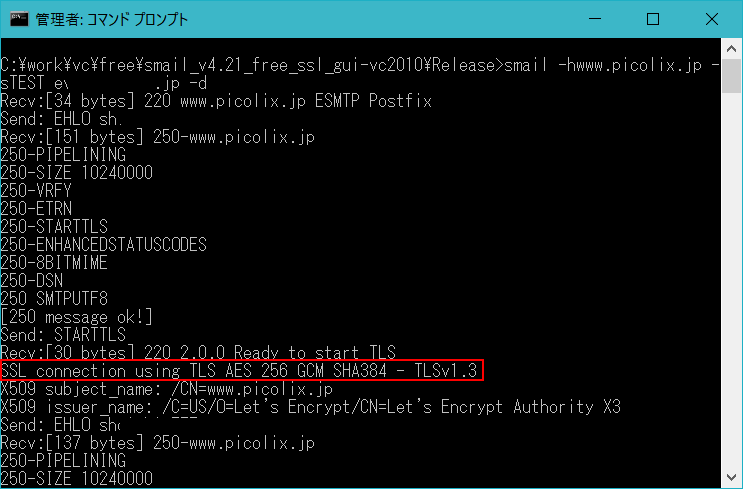
4.smail動作確認
SSL暗号化は、設定上SSLv2/v3を選択。(自動でsslv2,v3,tls 1,1.1,1.2,1.3が適応されます。TLSを選択した場合はtls1.0固定 このあたりは文言修正予定)
サーバ側のログ
==
Dec 21 20:16:27 www postfix/smtpd[11397]: Anonymous TLS connection established from xx.xxx.xx[xx.xx.xx.xx]: TLSv1.3 with cipher TLS_AES_256_GCM_SHA384 (256/256 bits)
==
TLS 1.3で通信できていることを確認。
当初tls 1.3用のclient_methodの関数がなくconnectionの方法を変えないといけないのかと思いましたが、勝手に tls 1.3が必要な時は、tls 1.3で通信できました。
(smail 近日バージョンアップ予定です。)